Tutorials/Getting Started Guide: Difference between revisions
mNo edit summary |
Fixed some grammar, added some links. Just a general page fix. |
||
| Line 1: | Line 1: | ||
[[File:Voltz banner.png|thumb|alt=Voltz Banner Logo]] | [[File:Voltz banner.png|thumb|alt=Voltz Banner Logo]] | ||
Hello and welcome to the starting guide for the [[Voltz]] mod pack. For information on how to install the Voltz modpack, [[Tutorials/Voltz_installation| | Hello, and welcome to the starting guide for the [[Voltz]] mod pack. For information on how to install the Voltz modpack, [[Tutorials/Voltz_installation|click here]]. | ||
Now that you have | Now that you have the mod pack installed, you're probably wondering where to start or what to do next. Well, you've come to the right page. By now, you should already know how to make all your basic tools, shelter and most of everything found in vanilla Minecraft. Unlike Tekkit, the Voltz mod pack expands on vanilla Minecraft while maintaining a "universal electricity" system. It also adds many new features, equipment, and ores. Here we will go over some of the new some of the things that will help you get started on new projects and game play. | ||
==First Steps: Preparing Materials== | ==First Steps: Preparing Materials== | ||
| Line 9: | Line 9: | ||
{{#ev:youtube|UPy2YCCNXw0|300|right|Getting Started Guide}} | {{#ev:youtube|UPy2YCCNXw0|300|right|Getting Started Guide}} | ||
Assuming you already have your basic tool set and a form of shelter | Assuming you already have your basic tool set and a form of shelter, we can begin some of the basic construction. | ||
One of the first tools | One of the first tools you'll want to make is a [[Paxel]], this way you can have all the benefits of a shovel, axe, and pickaxe all in one tool. All you need to do is make yourself a stone shovel, pickaxe, and axe, place them along the top row of a crafting table, and then place two sticks down the middle. Now you have yourself a [[Paxel]]. Paxels can be made from different types of tool sets such as diamond or gold tools, as well as many other ore tools that have been added to the game by Mekanism. | ||
{{Grid/Crafting Table | {{Grid/Crafting Table | ||
| Line 21: | Line 21: | ||
'''Note:''' The [[Paxel]] has the same durability as a single normal tool. While it will save inventory space by combining three tools into one, it will also wear out after as many uses as a single normal tool. | '''Note:''' The [[Paxel]] has the same durability as a single normal tool. While it will save inventory space by combining three tools into one, it will also wear out after as many uses as a single normal tool. | ||
Now that you have your [[Paxel]] | Now that you have your [[Paxel]] we can go do some mining for some of the new ores introduced by the Voltz mod pack. Some of the basic materials we are going to need to mine right now are Iron Ore, [[Tin Ore]], [[Copper Ore]], and [[Platinum Ore]]. You will also need to mine a whole bunch of coal and redstone to power the machines in the beginning. Once you have collected all of the materials, melt some of your metal ores into ingots, but not all of them. Here is a good minimum shopping list of materials for a [[Coal Generator]] and a [[Battery Box]]. | ||
{{Grid|Furnace}}{{Grid|Copper Ingot, 17}}{{Grid|Leather,6;White Wool,6}}{{Grid|Iron Ingot,11}}{{Grid|Tin Ingot,22}}{{Grid|Coal,64}}{{Grid|Redstone (Dust),3}} | {{Grid|Furnace}}{{Grid|Copper Ingot, 17}}{{Grid|Leather,6;White Wool,6}}{{Grid|Iron Ingot,11}}{{Grid|Tin Ingot,22}}{{Grid|Coal,64}}{{Grid|Redstone (Dust),3}} | ||
| Line 37: | Line 37: | ||
|Output=Bronze Dust}} | |Output=Bronze Dust}} | ||
:And smelt it | :And smelt it to make [[Bronze Ingot]]s | ||
{{Grid/Furnace | {{Grid/Furnace | ||
|Input=Bronze Dust,7 | |Input=Bronze Dust,7 | ||
| Line 43: | Line 43: | ||
|Fuel=Coal}} | |Fuel=Coal}} | ||
:Do the same thing for [[Steel Dust]] and [[Steel Ingot]] | :Do the same thing for [[Steel Dust]] and [[Steel Ingot]]s | ||
{{Grid/Crafting Table | {{Grid/Crafting Table | ||
|B1=Coal | |B1=Coal | ||
| Line 55: | Line 55: | ||
|Fuel=Coal,2}} | |Fuel=Coal,2}} | ||
Before moving on to the next step make sure you have {{Grid|Steel Ingot,10}} and {{Grid|Bronze Ingot,7}}. | |||
===Motors, Batteries, and Wire=== | ===Motors, Batteries, and Wire=== | ||
Now we start making some components. | Now we can start making some components. | ||
:[[Insulated Copper Wire]] These are used for the Motor Below | :[[Insulated Copper Wire]] These are used for the Motor Below | ||
| Line 75: | Line 75: | ||
|Output=Motor}} | |Output=Motor}} | ||
:The last | :The last components we need are some [[Battery|Batteries]]. | ||
{{Grid/Crafting Table | {{Grid/Crafting Table | ||
|B1=Tin Ingot | |B1=Tin Ingot | ||
| Line 85: | Line 85: | ||
===Put It All Together=== | ===Put It All Together=== | ||
Finally we have everything we need to make our first power connection, | Finally, we have everything we need to make our first power connection, here are the final things we need to build. | ||
| Line 103: | Line 103: | ||
|Output=Battery Box}} | |Output=Battery Box}} | ||
You can now place the [[Battery Box]] and the [[Coal Generator]] in the world. To connect them, | You can now place the [[Battery Box]] and the [[Coal Generator]] in the world. To connect them, place the remaining [[Insulated Copper Wire]] on the ground like you would redstone, making sure to connect the black hole on the [[Coal Generator]] to the red hold in the [[Battery Box]]. | ||
[[File:Generator_Battery_Front.png|300px]][[File:Generator_BatteryBox_Back.png|300px]] | [[File:Generator_Battery_Front.png|300px]][[File:Generator_BatteryBox_Back.png|300px]] | ||
Place some [[Coal]] into the [[Coal Generator]] and it should spring to life after | Place some [[Coal]] into the [[Coal Generator]] and it should spring to life after roughly 10 seconds. | ||
[[File:Coal_Generator_Interface.png|500px]] | [[File:Coal_Generator_Interface.png|500px]] | ||
| Line 119: | Line 119: | ||
Once you have gathered all your materials from the previous step, we can move on to the next phase. | Once you have gathered all your materials from the previous step, we can move on to the next phase. | ||
: | :Craft 3 [[Enriched Alloy]]s | ||
{{Grid/Crafting Table | {{Grid/Crafting Table | ||
|A1=|B1=Redstone (Dust)|C1= | |A1=|B1=Redstone (Dust)|C1= | ||
| Line 126: | Line 126: | ||
|Output=Enriched Alloy}} | |Output=Enriched Alloy}} | ||
: | :Craft 2 [[Control Circuit]]s | ||
{{Grid/Crafting Table | {{Grid/Crafting Table | ||
|B1 = Platinum Ignot | |B1 = Platinum Ignot | ||
| Line 133: | Line 133: | ||
|Output = Control Circuit}} | |Output = Control Circuit}} | ||
: | :Craft the [[Metallurgic Infuser]] | ||
{{Grid/Crafting Table | {{Grid/Crafting Table | ||
|A1 = Iron (Ingot) |B1 = Furnace |C1 = Iron (Ingot) | |A1 = Iron (Ingot) |B1 = Furnace |C1 = Iron (Ingot) | ||
| Line 140: | Line 140: | ||
|Output = Metallurgic Infuser}} | |Output = Metallurgic Infuser}} | ||
Now that we have the | Now that we have the Infuser, we can go ahead and make some [[Bronze Ingot (Mekanism)|Bronze Ingots]] as well as [[Steel Ingot (Mekanism)|Steel Ingots]]. First will be the [[Steel Ingot (Mekanism)|Steel Ingots]], which are made by putting [[Enriched Iron]] and [[Compressed Carbon]] in the Infuser. | ||
: | :Craft some [[Enriched Iron]] | ||
{{Grid/Crafting Table | {{Grid/Crafting Table | ||
|A1=Enriched Alloy | |A1=Enriched Alloy | ||
| Line 151: | Line 151: | ||
: | :Now for some [[Compressed Carbon]] | ||
{{Grid/Furnace|Input= Coal |IA= 1|Output= Compressed Carbon |OA= 1|Fuel= Coal |FA= 1}} | {{Grid/Furnace|Input= Coal |IA= 1|Output= Compressed Carbon |OA= 1|Fuel= Coal |FA= 1}} | ||
Add those together in the | Add those together in the Infuser with some redstone in the charge slot and you get [[Steel Dust (Mekanism)|Steel Dust]]. Make 9 Steel Dust and smelt it in a furnace. We will use the steel for the next machine, the [[Enrichment Chamber]], which is where the [[Tin Ore]] will go. | ||
| Line 161: | Line 161: | ||
Make a [[Steel Block]] with the 9 ingots you just created, 2 more [[Control Circuits]], 2 | Make a [[Steel Block]] with the 9 ingots you just created, 2 more [[Control Circuits]], 2 redstone, and 4 [[Enriched Alloy]]s. | ||
{{Grid/Crafting Table | {{Grid/Crafting Table | ||
| Line 170: | Line 170: | ||
Add | Add the items from the previous steps together like so to create the Enrichment Chamber. | ||
{{Grid/Crafting Table | {{Grid/Crafting Table | ||
| Line 179: | Line 179: | ||
With the [[Enrichment Chamber]] we can make dust straight from ores, which is what | With the [[Enrichment Chamber]] we can make dust straight from ores, which is what we're gonna do with [[Tin Ore]]. The Enrichment Chamber will give 2 dust per ore.<br /> | ||
[[File:EC_Tinore_to_dust.png]] | [[File:EC_Tinore_to_dust.png]] | ||
Once you have some Tin Dust, go back to the [[Metallurgic Infuser]] and insert the [[Tin Dust]] and [[Copper Ore]]. This will then start producing your [[Bronze Ingot]] | Once you have some Tin Dust, go back to the [[Metallurgic Infuser]] and insert the [[Tin Dust]] and [[Copper Ore]] into it. This will then start producing your [[Bronze Ingot]], which will create our power source. When you're ready, continue on the next tutorial, located here: [[Tutorials/Electricity_Tutorial|Electricity Tutorial]]<br /> | ||
[[File:Bronze_metallurgic.png]] | [[File:Bronze_metallurgic.png]] | ||
Revision as of 00:20, 4 February 2013

Hello, and welcome to the starting guide for the Voltz mod pack. For information on how to install the Voltz modpack, click here.
Now that you have the mod pack installed, you're probably wondering where to start or what to do next. Well, you've come to the right page. By now, you should already know how to make all your basic tools, shelter and most of everything found in vanilla Minecraft. Unlike Tekkit, the Voltz mod pack expands on vanilla Minecraft while maintaining a "universal electricity" system. It also adds many new features, equipment, and ores. Here we will go over some of the new some of the things that will help you get started on new projects and game play.
Contents
First Steps: Preparing Materials
Assuming you already have your basic tool set and a form of shelter, we can begin some of the basic construction.
One of the first tools you'll want to make is a Paxel, this way you can have all the benefits of a shovel, axe, and pickaxe all in one tool. All you need to do is make yourself a stone shovel, pickaxe, and axe, place them along the top row of a crafting table, and then place two sticks down the middle. Now you have yourself a Paxel. Paxels can be made from different types of tool sets such as diamond or gold tools, as well as many other ore tools that have been added to the game by Mekanism.
Note: The Paxel has the same durability as a single normal tool. While it will save inventory space by combining three tools into one, it will also wear out after as many uses as a single normal tool.
Now that you have your Paxel we can go do some mining for some of the new ores introduced by the Voltz mod pack. Some of the basic materials we are going to need to mine right now are Iron Ore, Tin Ore, Copper Ore, and Platinum Ore. You will also need to mine a whole bunch of coal and redstone to power the machines in the beginning. Once you have collected all of the materials, melt some of your metal ores into ingots, but not all of them. Here is a good minimum shopping list of materials for a Coal Generator and a Battery Box.
Once you have done that, we can move onto the next step.
Second Step: Get Power
Steel and Bronze
Now that we have our stuff we need to start combining it all together. First we need to turn some of our materials into Bronze Ingots and Steel Ingots.
- Make some Bronze Dust
- And smelt it to make Bronze Ingots
- Do the same thing for Steel Dust and Steel Ingots
Before moving on to the next step make sure you have ![]() 10 and
10 and ![]() 7.
7.
Motors, Batteries, and Wire
Now we can start making some components.
- Insulated Copper Wire These are used for the Motor Below
- Now we can make a Motor
- The last components we need are some Batteries.
After all your crafting you should have ![]() ,
, ![]() 2, and
2, and ![]() 3
3
Put It All Together
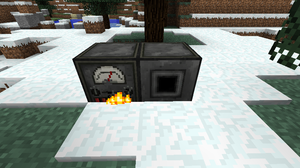
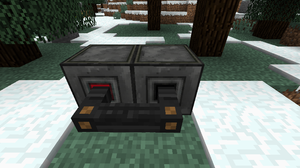
Finally, we have everything we need to make our first power connection, here are the final things we need to build.
You can now place the Battery Box and the Coal Generator in the world. To connect them, place the remaining Insulated Copper Wire on the ground like you would redstone, making sure to connect the black hole on the Coal Generator to the red hold in the Battery Box.
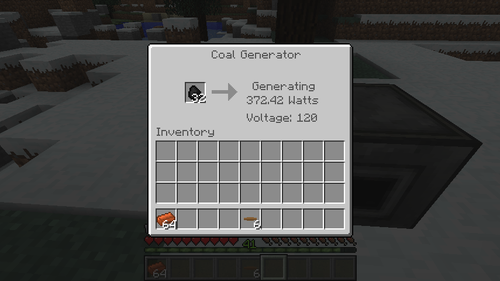
Place some Coal into the Coal Generator and it should spring to life after roughly 10 seconds.
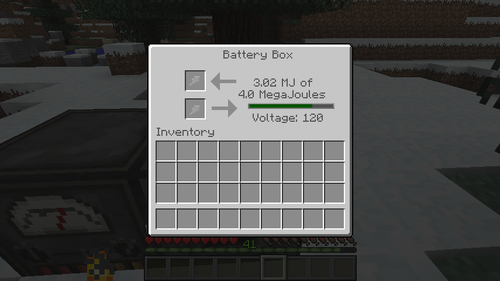
Right-click on the Battery Box and you should see it filling with power!
Third Step: Using Power
Once you have gathered all your materials from the previous step, we can move on to the next phase.
- Craft 3 Enriched Alloys
- Craft 2 Control Circuits
- Craft the Metallurgic Infuser
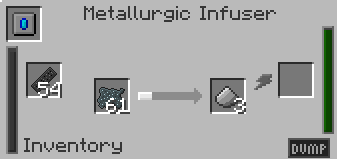
Now that we have the Infuser, we can go ahead and make some Bronze Ingots as well as Steel Ingots. First will be the Steel Ingots, which are made by putting Enriched Iron and Compressed Carbon in the Infuser.
- Craft some Enriched Iron
- Now for some Compressed Carbon
Add those together in the Infuser with some redstone in the charge slot and you get Steel Dust. Make 9 Steel Dust and smelt it in a furnace. We will use the steel for the next machine, the Enrichment Chamber, which is where the Tin Ore will go.
Make a Steel Block with the 9 ingots you just created, 2 more Control Circuits, 2 redstone, and 4 Enriched Alloys.
Add the items from the previous steps together like so to create the Enrichment Chamber.
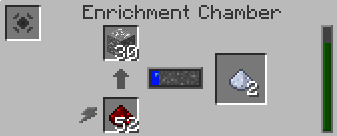
With the Enrichment Chamber we can make dust straight from ores, which is what we're gonna do with Tin Ore. The Enrichment Chamber will give 2 dust per ore.
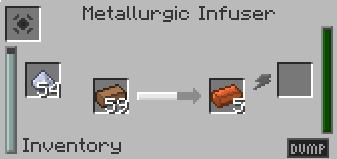
Once you have some Tin Dust, go back to the Metallurgic Infuser and insert the Tin Dust and Copper Ore into it. This will then start producing your Bronze Ingot, which will create our power source. When you're ready, continue on the next tutorial, located here: Electricity Tutorial
See also
| |||||||||||
