Tutorials/Getting Started Guide: Difference between revisions
No edit summary |
|||
| (19 intermediate revisions by 7 users not shown) | |||
| Line 1: | Line 1: | ||
[[File:Voltz banner.png|thumb|alt=Voltz Banner Logo]] | [[File:Voltz banner.png|thumb|alt=Voltz Banner Logo]] | ||
Hello, and welcome to the starting guide for the [[Voltz]] mod pack. For information on how to install the Voltz modpack, [[Tutorials/Voltz_installation|click here]]. | Hello, and welcome to the starting guide for the [[Voltz]] mod pack. For information on how to install the Voltz modpack, [[Tutorials/Voltz_installation|click here]]. | ||
Now that you have the mod pack installed, you're probably wondering where to start or what to do next. Well, you've come to the right page. By now, you should already know how to make all your basic tools, shelter and most of everything found in vanilla Minecraft. Unlike Tekkit, the Voltz mod pack expands on vanilla Minecraft while maintaining a "universal electricity" system. It also adds many new features, equipment, and ores. Here we will go over some of the things that will help you get started on new projects and gameplay. | Now that you have the mod pack installed, you're probably wondering where to start or what to do next. Well, you've come to the right page. By now, you should already know how to make all your basic tools, shelter and most of everything found in vanilla Minecraft. Unlike Tekkit, the Voltz mod pack expands on vanilla Minecraft while maintaining a "universal electricity" system. It also adds many new features, equipment, and ores. Here we will go over some of the things that will help you get started on new projects and gameplay. | ||
''Note that this tutorial is for the Voltz mod-pack version of UE mods. It is does not apply to UE mods based on MC 1.5.2.'' For instance, it tells you to build a [[Coal Generator]] and a [[Battery Box]], but those no longer exist. Instead, be sure to have Mekanism installed and substitute [[Coal Generator]] with [[Heat Generator]] and [[Battery Box]] with [[Basic Energy Cube]]. You will also find that there is no [[Platinum Ore]]. Mekanism provides [[Osmium Ore]], however, which has replaced platinum. Another part of this tutorial that no longer applies is the requirement for [[Bronze]] and an [[Enrichment Chamber]]. You don't need either of those to get a heat generator and basic energy cube, but you'll want to get them anyway so the information is still useful for a starter guide. | |||
==First Steps: Prepare Materials== | ==First Steps: Prepare Materials== | ||
<!--If you wish to add a video, add it to the END. We will then review it and move it up if it is better than the others. Failing to do so will get you banned from the wiki--> | <!--If you wish to add a video, add it to the END. We will then review it and move it up if it is better than the others. Failing to do so will get you banned from the wiki--> | ||
| Line 22: | Line 24: | ||
'''Note:''' The [[Paxel]] has the same durability as a single normal tool. While it will save inventory space by combining three tools into one, it will also wear out after as many uses as a single normal tool. | '''Note:''' The [[Paxel]] has the same durability as a single normal tool. While it will save inventory space by combining three tools into one, it will also wear out after as many uses as a single normal tool. | ||
Now that you have your [[Paxel]] we can go do some mining for some of the new ores introduced by the Voltz mod pack. Some of the basic materials we are going to need to mine right now are Iron Ore, [[Tin Ore]], [[Copper Ore]], and [[ | Now that you have your [[Paxel]] we can go do some mining for some of the new ores introduced by the Voltz mod pack. Some of the basic materials we are going to need to mine right now are Iron Ore, [[Tin Ore]], [[Copper Ore]], and [[Osmium Ore]]. You will also need to mine a whole bunch of coal and redstone to power the machines in the beginning. Once you have collected all of the materials, melt some of your metal ores into ingots, but not all of them. Here is a good minimum shopping list of materials for a [[Coal Generator]] and a [[Battery Box]]. | ||
{{Grid|Furnace, 3}}{{Grid|Copper Ingot, 10}}{{Grid|Leather,6;White Wool,6}}{{Grid|Iron Ingot,22}}{{Grid|Tin Ingot,10}}{{Grid|Coal,64}}{{Grid|Redstone (Dust),64}}{{Grid|Redstone (Dust), 64}}{{Grid| | {{Grid|Furnace, 3}}{{Grid|Copper Ingot, 10}}{{Grid|Leather,6;White Wool,6}}{{Grid|Iron Ingot,22}}{{Grid|Tin Ingot,10}}{{Grid|Coal,64}}{{Grid|Redstone (Dust),64}}{{Grid|Redstone (Dust), 64}}{{Grid|Osmium Ingot, 16}} | ||
Once you have done that, we can move onto the next step. | Once you have done that, we can move onto the next step. | ||
== | ==Fundamentals== | ||
You will need quite a few new materials before you can truly delve into the full experience Voltz provides, which we will go over here. Make sure to keep an ample supply of [[Iron Ingot]]s, [[Coal]], [[Copper Ingot]]s and [[Osmium Ingot]]s from here on out, as they are used in many recipes in this modpack. | |||
===Steel and Bronze=== | ===Steel and Bronze=== | ||
Now that we have collected some of the fundamental items, we must combine them to create the mod's first essential crafting materials.[[Bronze Ingot|Bronze]] and [[Steel Ingot|Steel]] ingots are some of the most utilized components, so we will craft these first. | Now that we have collected some of the fundamental items, we must combine them to create the mod's first essential crafting materials.[[Bronze Ingot|Bronze]] and [[Steel Ingot|Steel]] ingots are some of the most utilized components, so we will craft these first. | ||
| Line 51: | Line 48: | ||
2 [[Control Circuit]]s | 2 [[Control Circuit]]s | ||
{{Grid/Crafting Table | {{Grid/Crafting Table | ||
|B1 = | |B1 = Osmium Ingot | ||
|A2 = | |A2 = Osmium Ingot |B2 = Enriched Alloy|C2 = Osmium Ingot | ||
|B3 = | |B3 = Osmium Ingot | ||
|Output = Control Circuit}} | |Output = Control Circuit}} | ||
| Line 92: | Line 89: | ||
Using this Steel, we can create an [[Enrichment Chamber]], which is the final component needed to produce [[Bronze Dust]], and thus Bronze ingots. First, craft a [[Steel | Using this Steel, we can create an [[Enrichment Chamber]], which is the final component needed to produce [[Bronze Dust]], and thus Bronze ingots. First, craft a [[Steel Casing]] with 3 [[Osmium Ingot]]s and one [[Steel Ingot (Mekanism)|Steel Ingot]]: | ||
{{Grid/Crafting Table | {{Grid/Crafting Table | ||
| | |A2 = Steel Ingot|B1 = Steel Ingot|B3 = Steel Ingot|C2 = Steel Ingot | ||
|B2 = Osmium Ingot | |||
| | |Output = Steel Casing}} | ||
|Output=Steel | |||
| Line 105: | Line 101: | ||
{{Grid/Crafting Table | {{Grid/Crafting Table | ||
|A1=Enriched Alloy|B1=Redstone (Dust)|C1=Enriched Alloy | |A1=Enriched Alloy|B1=Redstone (Dust)|C1=Enriched Alloy | ||
|A2=Control Circuit|B2=Steel | |A2=Control Circuit|B2=Steel Casing|C2=Control Circuit | ||
|A3=Enriched Alloy|B3=Redstone (Dust)|C3=Enriched Alloy | |A3=Enriched Alloy|B3=Redstone (Dust)|C3=Enriched Alloy | ||
|Output=Enrichment Chamber}} | |Output=Enrichment Chamber}} | ||
| Line 187: | Line 183: | ||
*[[Tutorials/Electricity_Tutorial|Electricity Tutorial]] | *[[Tutorials/Electricity_Tutorial|Electricity Tutorial]] | ||
Latest revision as of 03:21, 10 June 2017

Hello, and welcome to the starting guide for the Voltz mod pack. For information on how to install the Voltz modpack, click here.
Now that you have the mod pack installed, you're probably wondering where to start or what to do next. Well, you've come to the right page. By now, you should already know how to make all your basic tools, shelter and most of everything found in vanilla Minecraft. Unlike Tekkit, the Voltz mod pack expands on vanilla Minecraft while maintaining a "universal electricity" system. It also adds many new features, equipment, and ores. Here we will go over some of the things that will help you get started on new projects and gameplay.
Note that this tutorial is for the Voltz mod-pack version of UE mods. It is does not apply to UE mods based on MC 1.5.2. For instance, it tells you to build a Coal Generator and a Battery Box, but those no longer exist. Instead, be sure to have Mekanism installed and substitute Coal Generator with Heat Generator and Battery Box with Basic Energy Cube. You will also find that there is no Platinum Ore. Mekanism provides Osmium Ore, however, which has replaced platinum. Another part of this tutorial that no longer applies is the requirement for Bronze and an Enrichment Chamber. You don't need either of those to get a heat generator and basic energy cube, but you'll want to get them anyway so the information is still useful for a starter guide.
Contents
First Steps: Prepare Materials
Assuming you already have your basic tool set and a form of shelter, we can begin some of the basic construction.
One of the first tools you'll want to make is a Paxel, this way you can have all the benefits of a shovel, axe, and pickaxe all in one tool. All you need to do is make yourself a stone shovel, pickaxe, and axe, place them along the top row of a crafting table, and then place two sticks down the middle. Now you have yourself a Paxel. Paxels can be made from different types of tool sets such as diamond or gold tools, as well as many other ore tools that have been added to the game by Mekanism.
Note: The Paxel has the same durability as a single normal tool. While it will save inventory space by combining three tools into one, it will also wear out after as many uses as a single normal tool.
Now that you have your Paxel we can go do some mining for some of the new ores introduced by the Voltz mod pack. Some of the basic materials we are going to need to mine right now are Iron Ore, Tin Ore, Copper Ore, and Osmium Ore. You will also need to mine a whole bunch of coal and redstone to power the machines in the beginning. Once you have collected all of the materials, melt some of your metal ores into ingots, but not all of them. Here is a good minimum shopping list of materials for a Coal Generator and a Battery Box.
Once you have done that, we can move onto the next step.
Fundamentals
You will need quite a few new materials before you can truly delve into the full experience Voltz provides, which we will go over here. Make sure to keep an ample supply of Iron Ingots, Coal, Copper Ingots and Osmium Ingots from here on out, as they are used in many recipes in this modpack.
Steel and Bronze
Now that we have collected some of the fundamental items, we must combine them to create the mod's first essential crafting materials.Bronze and Steel ingots are some of the most utilized components, so we will craft these first.
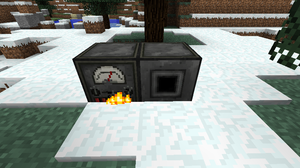
In order to get these, we must first have crafted a Metallurgic Infuser. This machine allows us to create more advanced ingots like Bronze and Steel by taking two items and fusing them together.
To craft our infuser, we will need the two items shown below: 3 Enriched Alloys
Integrate the above items along with 2 furnaces and 4 iron ingots to craft the Metallurgic Infuser
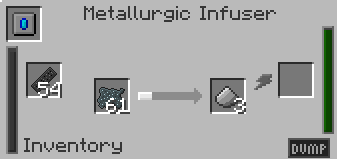
Although we have the machine, we cannot yet create our ingots. We still require some Enriched Iron and Compressed Carbon to be used inside the infuser.
To make Enriched Iron, we need 2 Enriched Alloys
Use the alloys with an iron ingot to make Enriched Iron
Then smelt some Compressed Carbon in a furnace
Using Compressed Carbon, Enriched Iron, and some Redstone to power the Metallurgic Infuser, we can finally create the first of our two essentials, a Steel ingot:
Using this Steel, we can create an Enrichment Chamber, which is the final component needed to produce Bronze Dust, and thus Bronze ingots. First, craft a Steel Casing with 3 Osmium Ingots and one Steel Ingot:
Using the previous recipes, make 2 more Control Circuits, 4 more Enriched Alloys. With the addition of 2 Redstone Dusts, combine all of the materials to craft the Enrichment Chamber:
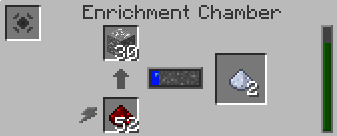
With the addition of the Enrichment Chamber, we can turn freshly mined ores into pairs of dust, some of which can then be further smelted into ingots at a 2:1 ration or used in later recipes found throughout Voltz. However for our purposes we need only do this with Tin Ore to create Tin Dust.
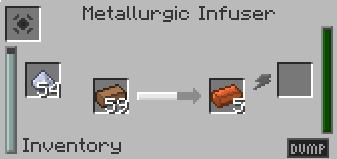
Using the tin dust and some copper ingots, create Bronze Ingots using the Metallurgic Infuser:
With these materials that we have collected, we can begin to create the items necessary for power generation and storage.
Motors, Batteries, and Wire
To begin crafting the machines and items necessary for a successful power configuration, we must first create more items that will be used in their recipes.
Insulated Copper Wire: These are used for the Motor below, as well as connecting your machines and other components together.
Using the wires, we can now craft a Motor
Lastly, we will need a set of Batteries.
After completing all of the necessary crafting, you should have these items: ![]() ,
, ![]() 2, and
2, and ![]() 3
3
Connection
Finally, we have everything we need to make our first power connection. Here are the final things we need to build.
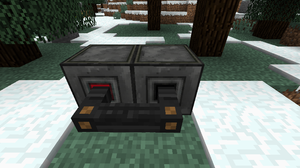
You can now place the Battery Box and the Coal Generator in the world. To connect them, place the remaining Insulated Copper Wire on the ground like you would redstone, making sure to connect the black hole on the Coal Generator to the red hole in the Battery Box. In Voltz, the black holes will always represent a machines output and red holes will always represent a machines input.
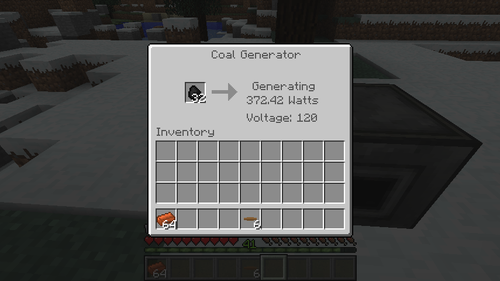
To generate Electricity from the Coal Generator, place some Coal in the single middle slot. It should begin to rise in hull heat, eventually reaching a value of 100%. After this point it will begin to generate electricity in the form of Watts(W). One Watt is worth one Joule (J) of energy, which is what the storage units found in Voltz read their current energy levels in. As you leave the generator on it will continue to generate Watts at a steadily increasing rate, capping at 10kW (The k stand for "kilo", which means 1000. This means that the machine is generating 10,000W, or 10,000J per second!).
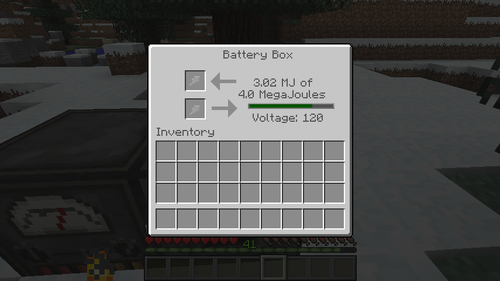
By right clicking on the Battery Box you should see it filling with power as shown by the power bar in the top middle section of the GUI. The top bar will represent the current level of charge and the bottom number represents the maximum amount of charge (In our case, 5MJ. The M here stands for mega, or million, so the machine can contain a maximum or 5 million joules!).
That just about concludes how to get yourself started in Voltz! Naturally, there are many other mods and features left for you to try out, however it is suggest you move from here to the components found in the Mekanism mod, as much of what is found there will build on the knowledge gained here. The tutorials below will also help to extend your knowledge of Voltz and the numerous mods it contains!
See also
| |||||||||||
